Leaving Community
Are you sure you want to leave this community? Leaving the community will revoke any permissions you have been granted in this community.
Tutorials
Table of Contents
- Video Tutorials
- ODC-TBI Data Spaces summary
- Step-by-step registration process
- How to prepare/format data for uploading
- How to upload data
- How to upload a new version of a dataset
- How to append new rows to a dataset
- How to Share/Release/Request to Publish a Dataset
- How to prepare a data dictionary (Data Dictionary Guidelines)
- How to upload a data dictionary or methodology file
- How to approve and promote lab members
- Metadata Editor Tutorial
- How to get additional help/report a bug
For general help and ODC descriptions, click here to go to the General Help/FAQ page.
Video Tutorials
Video tutorials for certain actions are available on the ODC youtube channel:
If you run into issues while following the walkthrough, please submit a helpdesk ticket through the ODC site.
ODC-TBI Data Spaces summary
Data moves through the ODC-TBI through distinct data spaces. Data is first uploaded to the Personal data space. The dataset can then be moved between the Personal, Lab, and Community data spaces at the PI's discretion. From any of these three spaces, the PI can also initiate the dataset publication/DOI request process, after which the dataset will be permanently published into the Public data space. The data space determines how accessible the dataset is to other ODC-TBI users:
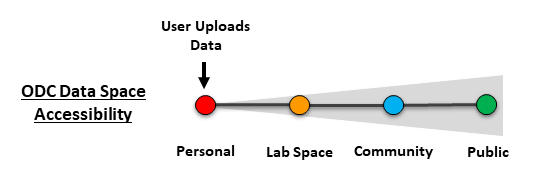
Data accessibility in the ODC data spaces
For more information about who can access the data in each data space, refer to the “How does privacy work on the ODC” in the General Help page.
Step-by-Step Registration Process
No Account to Registered User
- On the home page (odc-tbi.org), click the “Create Account” button. Fill out the New Account form and verify your account in your email.

Registered User to General Member
- Once logged in, on the home page (odc-tbi.org), click the “Join ODC Community” button. This will trigger a request to the ODC committee. Approval can take up to 3 business days.

General Member to Lab Member
- Once logged in, click on the buttons or links labeled “Join/Register” or “Create/Join a Lab” on your dashboard or navigation menu.
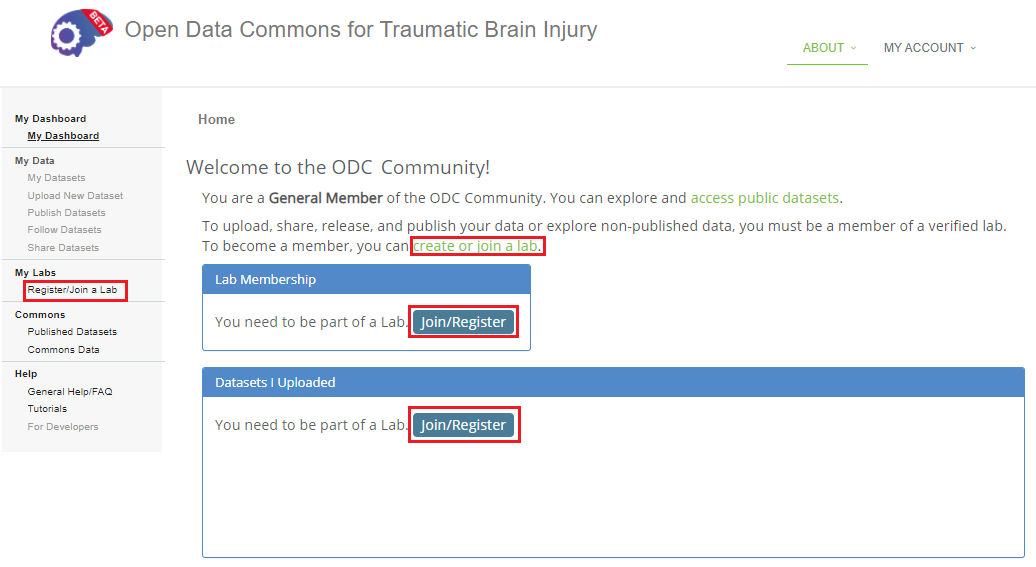
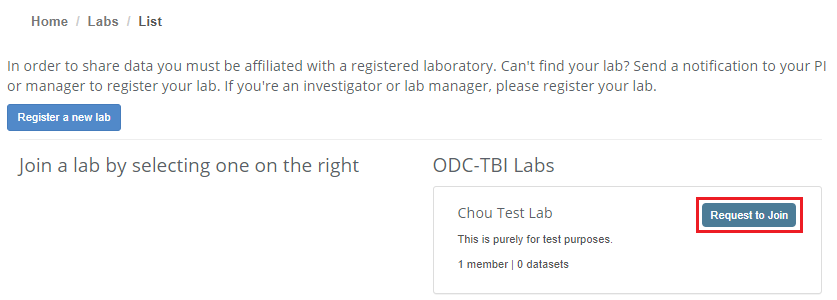
- To register a new lab, click the “Register a new lab” button on the labs page. This will trigger a request to the ODC committee. Approval can take up to 3 business days.
- To join an existing lab, find the lab name under the list of ODC-TBI labs on the labs page. Click the “Request to Join” button. This will trigger a request to the lab’s PI/managers. They will need to approve you.
How to prepare/format data for uploading
If your dataset is already formatted, go to the "How to Upload Data" tutorial.
For a list of common upload errors because of dataset formatting, see "Common errors during data upload".
General Guidelines
The current ODC supports upload of spreadsheet data in .csv format. Here are the general guidelines for formatting your data in preparation for uploading to the ODC:
- Subject ID column: The ODC repository is organized around subjects. One of your dataset columns must contain the subject or animal identifier (e.g. Subject_ID).
- Columns as Variables: Each column represents a study parameter or outcome measure (i.e. Variables).
- First row lists the Variable names
- Subsequent rows as observations: Each row represents a single animal.
- An animal could have multiple rows. For example, your dataset might include multiple timepoints for each animal, in which case each row might represent a unique observation of an animal at a specific timepoint. The Subject ID column will help identify all the data for each specific animal in the dataset.
- Column/Variable name requirements (based on best practices):
- Variable name must be shorter than 64 characters.
- Variable names must start with a letter.
- Variable names should be intuitive (e.g. use “Date_Birth” instead of “DB”).
- Do not use spaces. Use underscore (“_”) instead.
- No special characters except underscores (“_”) and periods (“.”). If you must use special characters, verify the corresponding Variable and data are uploaded correctly.
- No duplicated Variable names: Every column header must have a unique name. If two of your columns have the same name, you will receive an error during data upload.
- Do not use commas: CSV files use commas to separate the contents of one cell from another. If you use commas in a cell, it may be read as a delimiter character (i.e. cell separator) which can lead to errors in data upload. If you must use commas, always double check that your data is uploaded correctly. Microsoft Excel can also save csv's in such a way to prevent misinterpretation of commas in your data. However, we generally recommend avoiding the use of commas in your dataset altogether.
The data structure described above and used by the ODC is known as the Tidy format. For more information, visit the “ODC Data Structure: Tidy Data Format” Help section.
Recommendation for handling Repeated Measures
There are two different ways to handle repeated measures (such as multiple timepoints or multiple slices or replicates): Semi-Long and Semi-Wide. We recommend using the Semi-Long approach to data formatting for repeated measures across time. If you need additional guidance, feel free to contact our help desk and an ODC Data Wrangler can assist you.
Semi-Long (recommended for repeated measures across Time)
In a Semi-Long format, the repeated measures are distributed across different rows with each row representing a subject at a specific timepoint, slice, replicate, etc. For repeated measures across time, we recommend using the semi-long format.
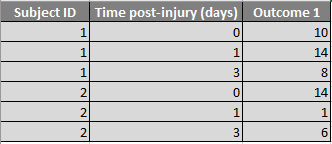
Example of a Semi-Long Tidy data for the ODC. For repeated measures across time, this is the recommended data structure for a dataset.
Semi-Wide

Example of a Semi-Wide Tidy data for the ODC.
Recommendation for Blank Values
When formatting your data, you will likely have many cells without any values. Reasons include:
- Data was missing or removed due to technical reasons
- Data wasn’t collected at the Observation (e.g. Subject at the specific Timepoint represented by the row)
Blank entries are completely ok! In fact, large datasets made up of many experiments with their own experimental cohort will have many blank cells. That’s to be expected.
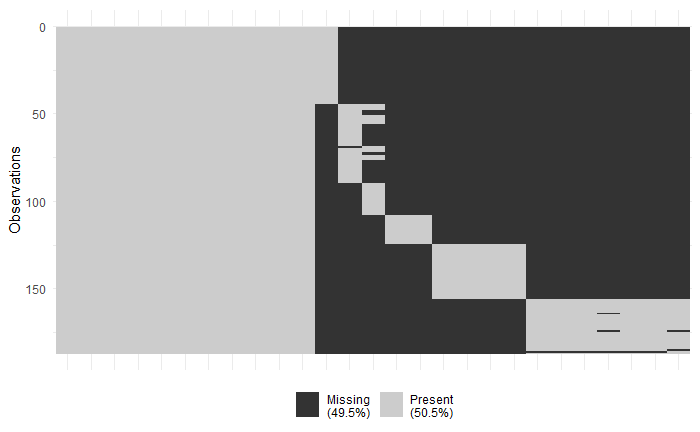
Visualization showing blank cells in an aggregated dataset. Chunks of data (corresponding to different experimental cohorts with different measured outcomes) are clearly identifiable.
How to Upload Data
Click here for a video tutorial (ODC youtube channel): "ODC Data Upload Walkthrough".
Checklist before you upload
For additional information on how to structure your dataset, go to “How to Prepare/Format Data”.
Before you upload, check that:
- The file is in CSV format (data spreadsheets in excel format can be converted to csv through Microsoft Excel)
- There are no duplicate variable names (i.e. column names in the first row)
- Every column name is shorter than 64 characters
- There are no empty rows before the variable names
- There are no leading underscores or spaces in the variable names (e.g. “_date” is not allowed)
- Minimize the use of special characters in the variable names other than underscores (“_”) or periods (“.”)
If you run into any errors during data upload, please refer to "Common errors during data upload".
Step-by-Step
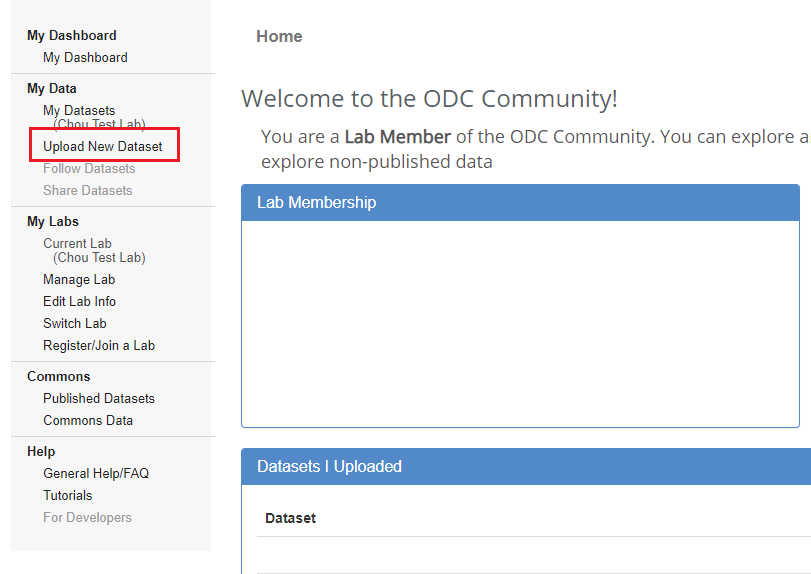
- Click on "Upload New Dataset" on the navigation menu under My Data.
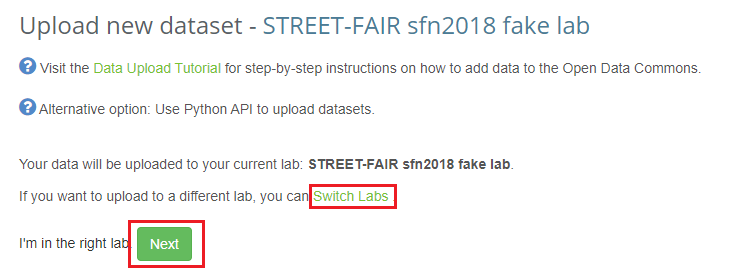
- Confirm the laboratory you are uploading the dataset to. If you need to switch labs, click the "Switch Labs" option and select the appropriate lab. Once you are in the correct lab, choose the "Next" button.
- Choose "Select File" to select the dataset file from your computer. The system automatically checks for some basic data format issues (such as file type). If the data can be uploaded properly, the filename will have a checkmark next to it. If an error was detected, an error message will appear.
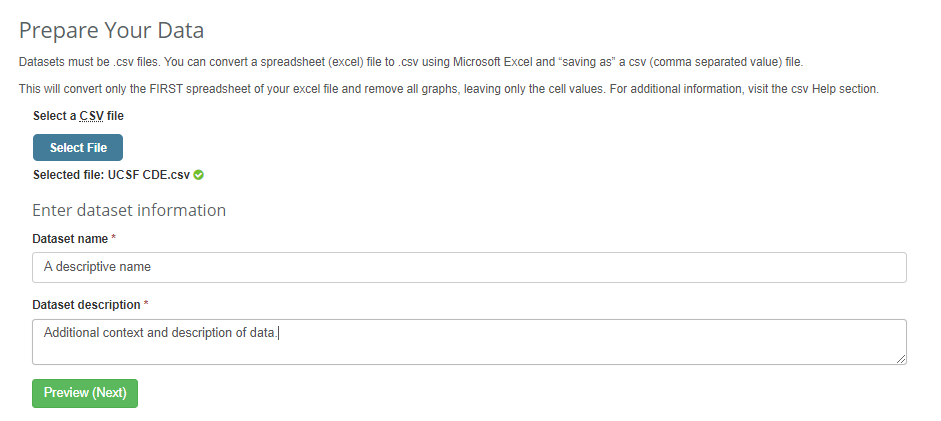
- Fill in the Dataset name and Dataset description. This name and description will only be visible to members of the ODC community, but we recommend providing good descriptive wording to provide better context for other lab/community members who view your dataset.
- Select "Preview (Next)" to continue and view the uploaded data.
- If your dataset triggers an upload error, double check and correct for the error. If you are having difficulty locating where the error is occurring, here is a list of "Common errors during data upload". If you need additional assistance, please contact the ODC data team at info@odc-tbi.org.
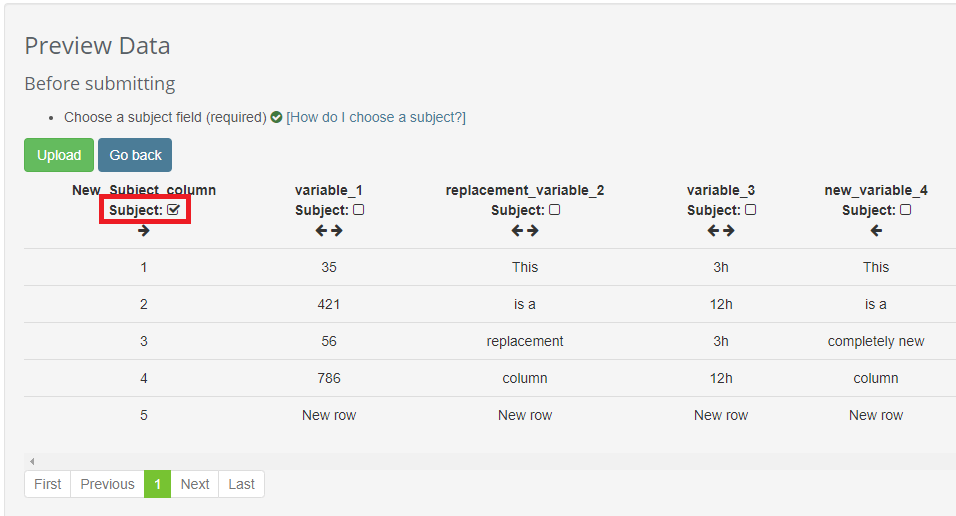
- In the Prepare Your Data stage, first choose a column that contains the Subject Field. The subject column is typically a column containing a unique identifier for each of your subjects or samples.
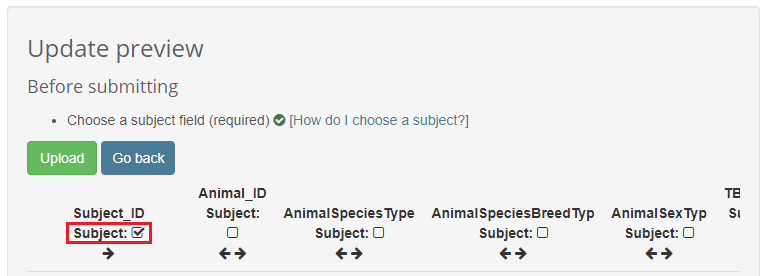
- Click the "Upload" button to continue.
- A progress bar may be visible as your data is uploaded. You will be directed to an “Upload completed” page once the upload is finished! You can click the "Go to new dataset" button to immediately go to the dataset. Please note that the dataset may still be processing for viewing on the ODC which might take a few minutes if the dataset is large.
- We highly encourage you to also upload a Data Dictionary and Methodology file to your dataset. These dataset-associated files help increase the data interpretability. The Tutorial page has additional sections about the Data Dictionary.
How to upload a new version of a dataset
Uploading a new version of a dataset will delete the old version in the process. We recommend downloading a copy of the current version before uploading a new one.
The "Upload new version" process will maintain all of the dataset metadata, the data dictionary, and the methodology document. You should update your data dictionary to match your new dataset as needed.
Additionally, any mapped CDEs will be preserved as long as the column name didn't change. If you rename a column, the interface treats this as a column deletion and new column addition; the CDE mapping will be deleted accordingly, so you will need to remap the CDE to the column after the upload.
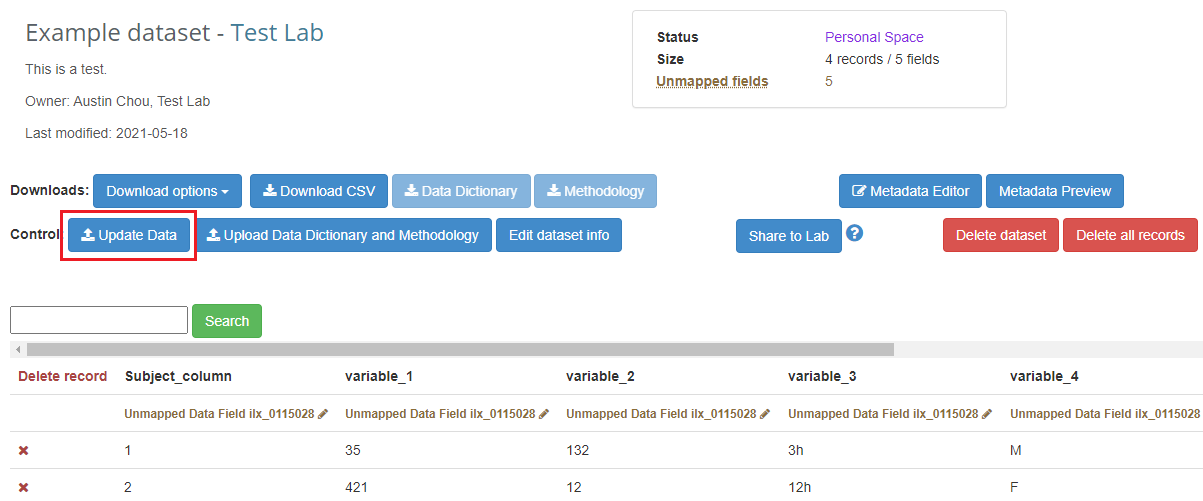
- Navigate to the individual dataset page for the dataset you want to update. Click the "Upload Data" button.
- Select the "Upload New Version" option.
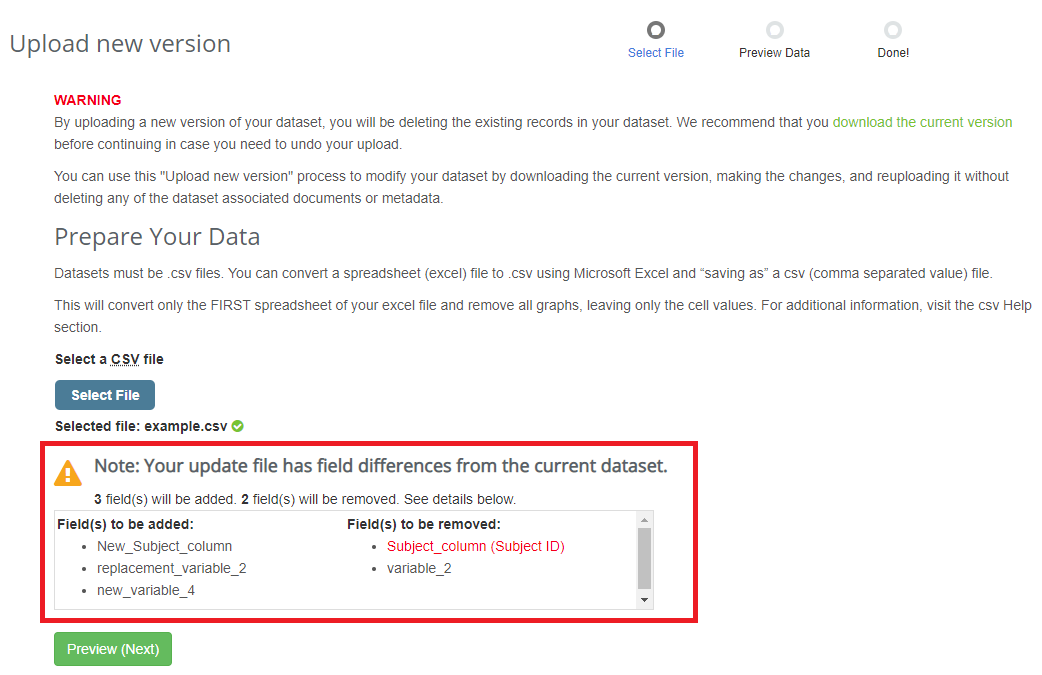
- Select the file containing the new version of your dataset. Caution: Once you complete the upload, the previous version of your dataset will be deleted. We recommend you download a copy of the current version before completing the upload process for the new version.
- If the new version has different column headers (either added or deleted), you will be presented with the information. Double check that the new fields and removed fields are correct. If you change the name of a column, the interface will handle it as a removal and addition. If the previous Subject ID column is being removed, it will be flagged in red for your attention (this will not cause an error, so you can continue with the process). Click "Preview (Next)" to continue.
- On the Preview Data page, make sure that the Subject column is correctly selected.
- Click the "Upload" button to continue. You will be prompted a final time to confirm your upload. Click "Continue submitting" to complete the process.
- A progress bar may be visible as your data is uploaded. You will be directed to an Upload Completed page once the upload is finished. You can click the "Go to dataset" button to immediately go to the dataset. Please note that the dataset may still be processing for viewing on the ODC which might take a few minutes if the dataset is large.
How to append new rows to a dataset
The "Append Rows" workflow will add new data rows to an existing dataset. The process will not affect any of the existing data entries. Additionally, the "Append Rows" workflow can also be used to upload large datasets in chunks.
Before starting the process, make sure that the file containing the rows you wish to append meets the following requirements:
- The dataset file is a .csv file.
- The first row of the file contains the exact same column headers as in the current dataset.
Additionally, make sure you do not include rows that already exist in your dataset. The "Append Rows" process will not check for pre-existing entries and this may result in duplicate rows in your dataset.
Step-by-Step
- Navigate to the individual dataset page for the dataset you want to update. Click the "Update Data" button.
- Select the "Append Rows" option.
- Select the file containing the new rows you want to append.
- An error will occur if your file is (1) missing a column that exists in your current dataset or (2) has a column that does not exist in your current dataset. Your file must contain the exact column headers that are in your current dataset. If you want to upload new columns, we recommend using the "Upload New Version" workflow instead.
- If your datafile is too large, you may also encounter an error. In this case, we recommend further splitting up your dataset and going through multiple "Append Rows" to upload your data.
- If there are no errors, click the "Preview (Next)" button that appears to continue.
- On the Preview Data page, double check that the new entries are correct. If so, click the "Upload" button to continue. You will be prompted a final time to confirm your upload. Click "Continue submitting" to complete the process.
- A progress bar may be visible as your data is uploaded. You will be directed to an Upload Completed page once the upload is finished. You can click the "Go to dataset" button to immediately go to the dataset. Please note that the dataset may still be processing for viewing on the ODC which might take a few minutes if the dataset is large.
How to Share/Release/Request to Publish a Dataset
There are two methods to moving a dataset into another data space. If you are the original uploader of the dataset, you can share your dataset to the Lab data space (or move it back to the Personal space if the dataset is in the Lab space).
Additionally, a PI or manager of the lab can move the dataset to any data space, including releasing it to the Community Space or initiating the publication process.
Original Uploader Sharing
- Navigate to the specific dataset page of the dataset you wish to share from your Personal space to the Lab space.
- Find and click the "Share to Lab" button. In the popup, confirm your action to share the dataset.
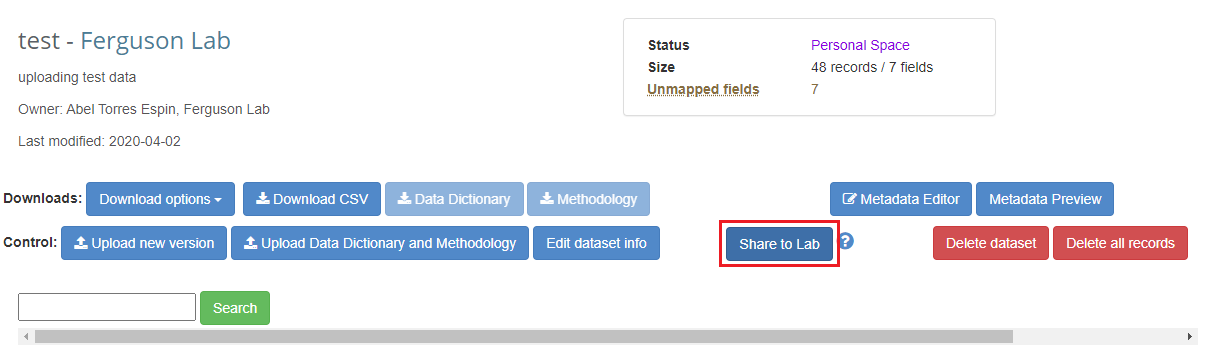
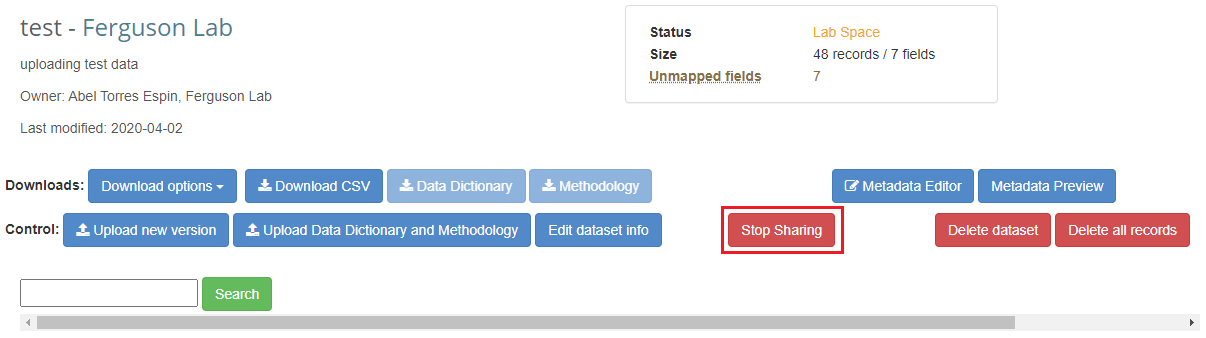
- After a moment, the data space status should update to the Lab Space. Additionally, the button will change to a "Stop Sharing" button.
- If you want to move the dataset back to the Personal space, use the "Stop Sharing" button. Once you confirm your action, the dataset will be moved back to the Personal space.
PI/Manager Share/Release/Request to Publish
- Make sure you are logged in as the PI or Lab Manager for the ODC lab and check that your Current Lab is correct. If you need to switch labs, use the “Switch Lab” option on the navigation menu.
- Select “Current Lab” on the navigation menu as the PI or Lab Manager.
- In the Dataset window, find the dataset of interest. Click on the dataset’s status to open the Change Dataset Status window.
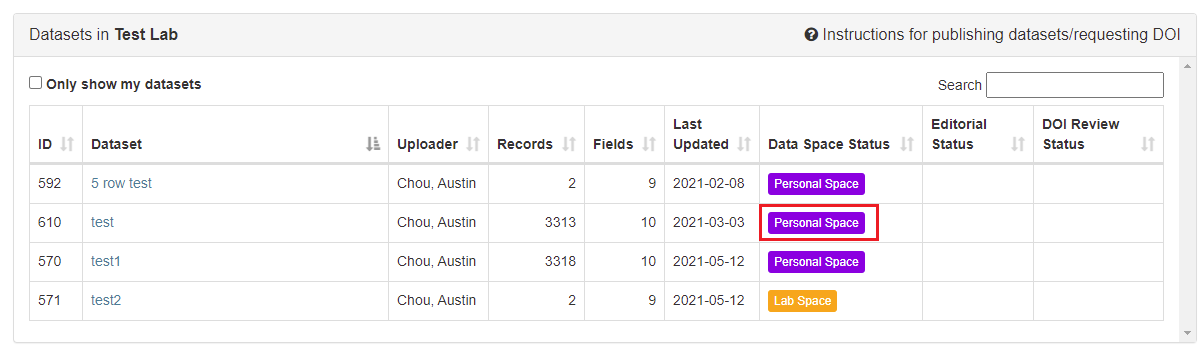
- Select the corresponding option and select "Update Status". The dataset will be assigned to the selected data space. Please refer to "How does privacy work on the ODC" section in the General Help page for information about which users can access data in each data space.
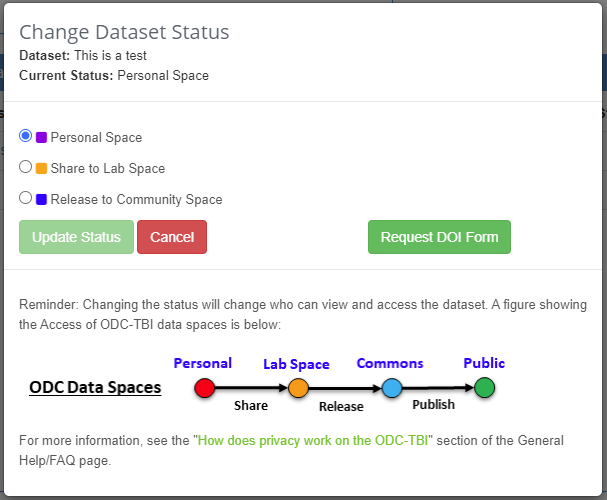
- If you want to publish your dataset to the Public space, click the "Request DOI Form" button. Fill out the form, confirm you understand that the Data Team will review your dataset, and submit the DOI request. This will initiate the publication and DOI request process. For more information about the publication process, dataset standards, and DOI metadata requirements, please refer to the "Minimal Dataset Standards" section in the General Help/FAQ page.
How to Prepare a Data Dictionary
Downloadable Template: Click here to download a template of the Data Dictionary with the required columns for publishing a dataset.
What is the purpose of a data dictionary?
A data dictionary is a file containing information about each Variable (i.e. column) in the dataset. The data dictionary provides critical information that increase the interpretability and reusability of the dataset. Importantly, the data dictionary helps other users understand what each of your Variables are and any important details you include. We encourage you to include a data dictionary with your dataset, even if you do not plan to publish the data.
Formatting Instructions
The data dictionary structure used by the ODC-TBI contains the following columns (all included in the template):
- VariableName: * Variables (i.e. column headers) that appear in the dataset. You must include all of your dataset variables in the data dictionary.
- Title: * Title is the full name of the variable when the VariableName contains abbreviations or shorthand. If the VariableName is already a complete name, you can copy and paste the VariableName into the Title entry.
- Unit_of_Measure: Units for the variable (if applicable).
- Description: * Definitions and descriptions of the variable. The description should explain what the variable represents in enough detail such that a reader can understand the contents of the column in the dataset.
- DataType: Specify whether the variable specifically contains Numeric, Categorical, Ordinal, Date, or Free Text data.
- PermittedValues: If the variable is not numeric or free text, list all possible values here (e.g. "Male, Female" for the variable "Sex"). If the variable is numeric or free text, can leave this blank (use MinimumValue and MaximumValue columns).
- MinimumValue: If the variable is numeric, list the Minimum possible value. For example, if you expect a variable to be between 0-100, write 0 for MinimumValue. If there is no minimum value, leave this blank.
- MaximumValue: If the variable is numeric, list the Maximum possible value. For example, if you expect a variable to be between 0-100, write 100 for MaximumValue. If there is no maximum value, leave this blank.
- Comments: Additional notes such as exclusion criteria, reasons for special values, etc.
When you upload a data dictionary, we will check that the data dictionary meets the following formatting requirements:
- The data dictionary contains all 9 columns.
- Every Variable (i.e. column header) in the dataset is listed under the VariableName column of the data dictionary.
- The data dictionary is a “.csv” formatted file.
When a dataset is submitted for DOI request and publication, we will require that a data dictionary is included with the submission. The minimum requirements for the data dictionary for dataset publication are:
- The data dictionary contains all 9 columns.
- Every Variable (i.e. column header) in the dataset has a respective row. I.e. Every Variable in the dataset must be listed under the VariableName column of the data dictionary.
- If the VariableName includes abbreviations or shorthand, the Title must be have an entry containing the full name of the variable. Otherwise the Title is the same as VariableName.
- Every row in the data dictionary has a Description provided. The Description must provide sufficient definition for the variable.
Step-by-Step Instructions
Create your data dictionary table (e.g. in excel) or use the downloadable template (recommended). Your data dictionary must have all 9 columns (with the exact column names):
- VariableName
- Title
- Unit_of_Measure
- Description
- DataType
- PermittedValues
- MinimumValue
- MaximumValue
- Comments
Fill the VariableName column with the Variable names (i.e. column headers) from your dataset. Every column in the dataset must have a row in the data dictionary.
Fill the Title column: If the VariableName contains shorthand or abbreviations, fill Title with the complete name of the variable. If the VariableName entry is already the complete variable name, then copy/paste the VariableName into the Title entry.
Fill the other columns as appropriate. Make sure every row has at least a complete VariableName, Title, and Description entry.
Save the Data Dictionary as a “.csv” file. You can do so using excel when you are saving the file.

Example of a Data Dictionary.
How to upload a data dictionary or methodology file
Each dataset can have a data dictionary file (.csv) and methodology file (.doc or .pdf) uploaded to be associated with the dataset. For instructions on how to prepare a data dictionary, see the "How to Prepare a Data Dictionary" tutorial.
Step-by-Step Instructions
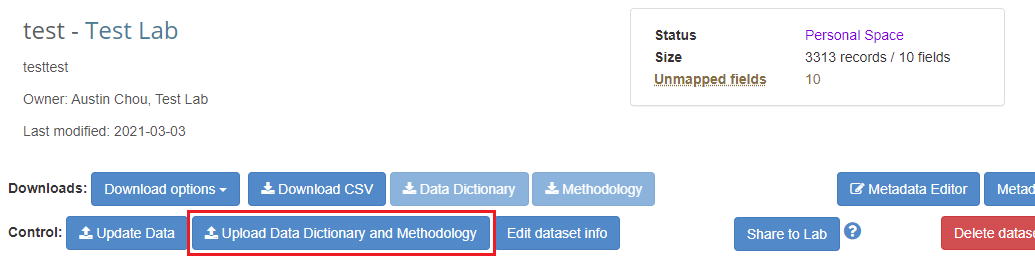
Navigate to the dataset page for the dataset you want to upload the data dictionary/methodology for. Note that you must be the original data uploader or a PI/lab manager for the corresponding ODC-TBI lab that the dataset was uploaded to.
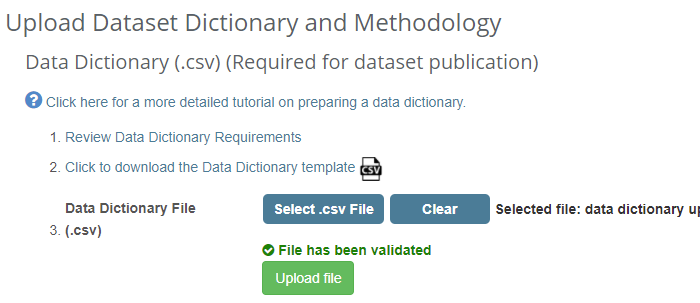
Click the "Upload Data Dictionary and Methodology" button.
Select the appropriate file under the appropriate section.
Data Dictionary: Make sure to review the data dictionary requirements. If you need to first prepare a data dictionary, see the "How to Prepare a Data Dictionary" tutorial for more information. Note that the upload process will check for the following errors/warnings:
- Error check: Your data dictionary file must be a .csv file type.
- Error check: Your data dictionary must contain all 9 data dictionary columns required (with exact spelling).
- Error check: Every variable (i.e. column header) in the dataset must be listed under the VariableName column of your data dictionary.
- Warning check: Every row of your data dictionary should at least have VariableName, Title, and Description columns filled out. This will only generate a warning, and you can still continue with the upload process. Note that if you request DOI/reuest to publish the dataset, your data dictionary must meet this requirement before a DOI can be assigned/the dataset is approved for publication.
Methodology: Make sure your methodology file is a .doc or .pdf. Make sure to also review the "Guidelines for dataset-associated methodology documents" under General Help.
- If you selected the wrong file and want to choose another file, click the "Clear" button that appears before selecting another file.
- Once you have selected an appropriate file, the "Upload" button should appear. Click it to upload and complete the process.

How to approve and promote lab members
Caution: By approving a user to join your lab, you are approving them to access all the datasets in your Lab data space and all the datasets in the Community data space. Please make sure you know who the user is before approving them. If you have any concerns, please contact us at info@odc-tbi.org.
Similarly, please be aware that a Manager level user shares many of the same authorizations as the lab PI on the ODC-TBI. This includes sharing/releasing/initiating publication of datasets and approving/removing users from the lab.
- Make sure you are logged in as the PI or Lab Manager for the ODC lab. On the navigation menu, select “Current Lab”. If the Current Lab is not the lab you want to approve/promote lab members in, you can hover over the "Switch Lab" link on the navigation menu and select the correct lab.
- In the Users window, find the user whose level you want to change. You will see the following buttons:
To promote/demote/remove an existing user: 
User Level | Authorization |
Member |
|
Manager |
|
PI |
|
Metadata Editor Tutorial
Click here for a video tutorial (ODC youtube channel): "ODC Metadata Editor Walkthrough".
In Development: The Metadata Editor feature is still In Development. We encourage and appreciate users to help us test for potential bugs. However, to prevent loss of any work, we recommend also writing/copy the metadata to the downloadable template and pasting the information into the Metadata Editor afterwards. If needed, you can email the data team (info@odc-tbi.org) with the completed template attached when you submit the dataset for publication.
One of the final steps towards publishing your dataset is putting together the metadata about the dataset. The Metadata Editor helps facilitate that task. Each dataset has a distinct Metadata Editor page with distinct sections outlined here. These sections must be completed before submitting the dataset for a DOI request and dataset publication.
You do not have to fill out the sections in a particular order. However, if your dataset is associated with a published paper, you can import the authors from the paper under the “Provenance / Originating Publications” section. Doing this first can help reduce the amount of manual entry.
Before submitting the dataset for publication: Please check that your metadata meets the Minimum Dataset Standards for publication. During the review process, the data team/editorial board will verify that your metadata is complete and sufficient. You can preview the metadata by hitting the “Preview DOI Metadata” button.
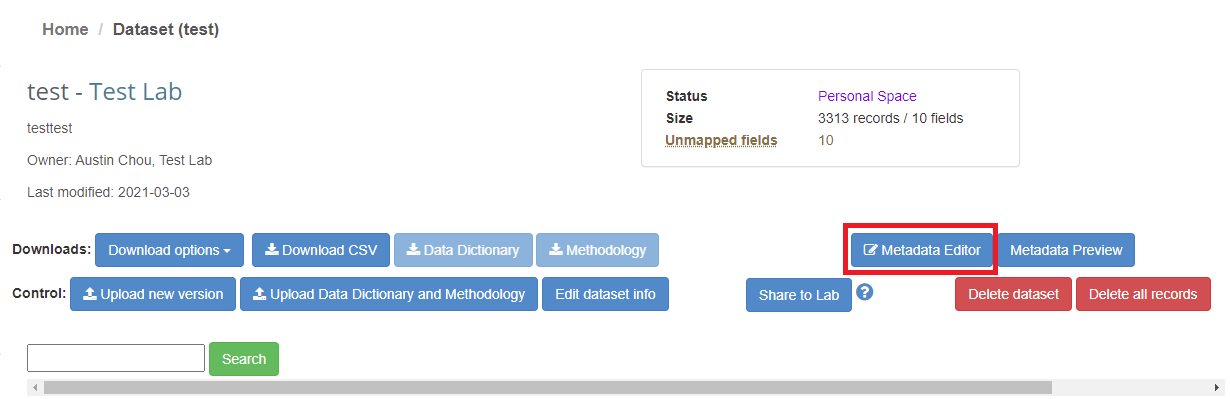
Accessing the Metadata Editor
To access the Metadata Editor for a dataset, first navigate to the corresponding dataset page. If you are the original data uploader or the PI of the ODC-TBI lab, you will be able to click on the "Metadata Editor" button to access the editor.
Dataset Publication Title
The Dataset Publication Title section includes 1 field: Title
- Title: Title that will be displayed on the dataset citation. Note that this will not change the title of the dataset visible within the ODC itself.
Abstract
The Abstract includes 3 fields: Study Purpose, Data Collected, Primary Conclusion.
- Study Purpose: Short description of the overall study purpose that resulted in the dataset.
- Data Collected: Summary of what kind of data is included in the dataset and how the data was collected. Please include important experiment parameters (such as experimental model and injury severity) and critical outcome measures included.
- Conclusions: Summary of conclusions (if any) made with the dataset at the time of dataset publication.
Keywords
Keywords can be added to allow search engines to locate the DOI and dataset citation once the dataset is published. The keywords are part of the Scicrunch Interlex database and the field automatically searches the database for best matches while you type. You can reorder the keywords after they are added by dragging/dropping them in the list.
Provenance / Originating Publication
If you are importing information from an existing publication, enter the DOI or PMID. Note that we can only import information from some preprint articles. Check the “Import authors as contributors” checkbox to import the publication’s author list automatically as contributors of the dataset (you will have to assign the dataset author and contact author labels to the respective entries after importing). After import, choose to edit the publication entry and fill out the remaining fields: Citation Relevance.
If you want to enter information manually (as in the case of preprint articles), you can create a blank entry by leaving the DOI/PMID field blank and hitting “Import/Add Publication.” Choose to edit the new entry and fill out the appropriate fields: DOI, PMID, Citation, Citation Relevance.
- DOI: DOI of the associated publication or resource
- PMID: PMID of the associated publication
- Citation: Citation of the associated publication or resource
- Citation relevance: Explanation of how the publication or resource is related to the dataset.
Notes
The Notes section should be used to provide important guidance for others on using your data. Relevant information may include technical issues during the experiment that may require data exclusion, specifics about the techniques that may prevent merging with other datasets, and so on. The goal is to provide information useful to data re-users and prevent data misuse.
Dataset Info
Dataset info is automatically populated from the other sections. The section includes: Contact Author information, Lab, ODC-TBI Accession Number, Number of Records in Dataset, Fields per Record, number of associated Files.
License
The License is automatically assigned once the dataset is published. All datasets published on the ODC-TBI will be under the Creative Commons Attribution License (CC-BY 4.0).
Funding and Acknowledgements
The Funding and Acknowledgements section requires 2 fields for each entry: Funding Agency, Funding Identifier and PI Initials. You can reorder the entries after they are added by dragging/dropping them in the list.
- Funding Agency: Name of funding agency.
- Funding Identifier and PI Initials: Respective funding ID (e.g. grant number) and PI Initials in parenthesis. For example: 4F0887Z (AC).
Contributors / Authors
Each Contributor/Author has 5 fields to fill out. Each entry is added as a contributor to the dataset by default; if you check the options to include an entry as an author or contact author, the appropriate label will be applied to the contributor/author entry.
Each entry includes: First Name, Middle Initial, Last Name, ORCID, Affiliation, and Contact Email (if contact author). Data that was imported might be incomplete and will need to be edited.
- First Name: Person’s first name.
- Middle Initial: Person’s middle initial (if relevant).
- Last Name: Person’s last name.
- ORCID: Person’s associated ORCID.
- Affiliation: Person’s associated affiliation at time of publishing the dataset.
- Contact Email: Person's contact email (field appears only if they are a contact author)
How to Get Additional Help or Report a Bug
Help Desk
If you can’t find a relevant help section for the page you’re on or need to report a bug, you can contact our help desk via the “Contact help desk” button at the bottom of every page. The button will automatically inform us of which page you are on when you contacted the help desk.
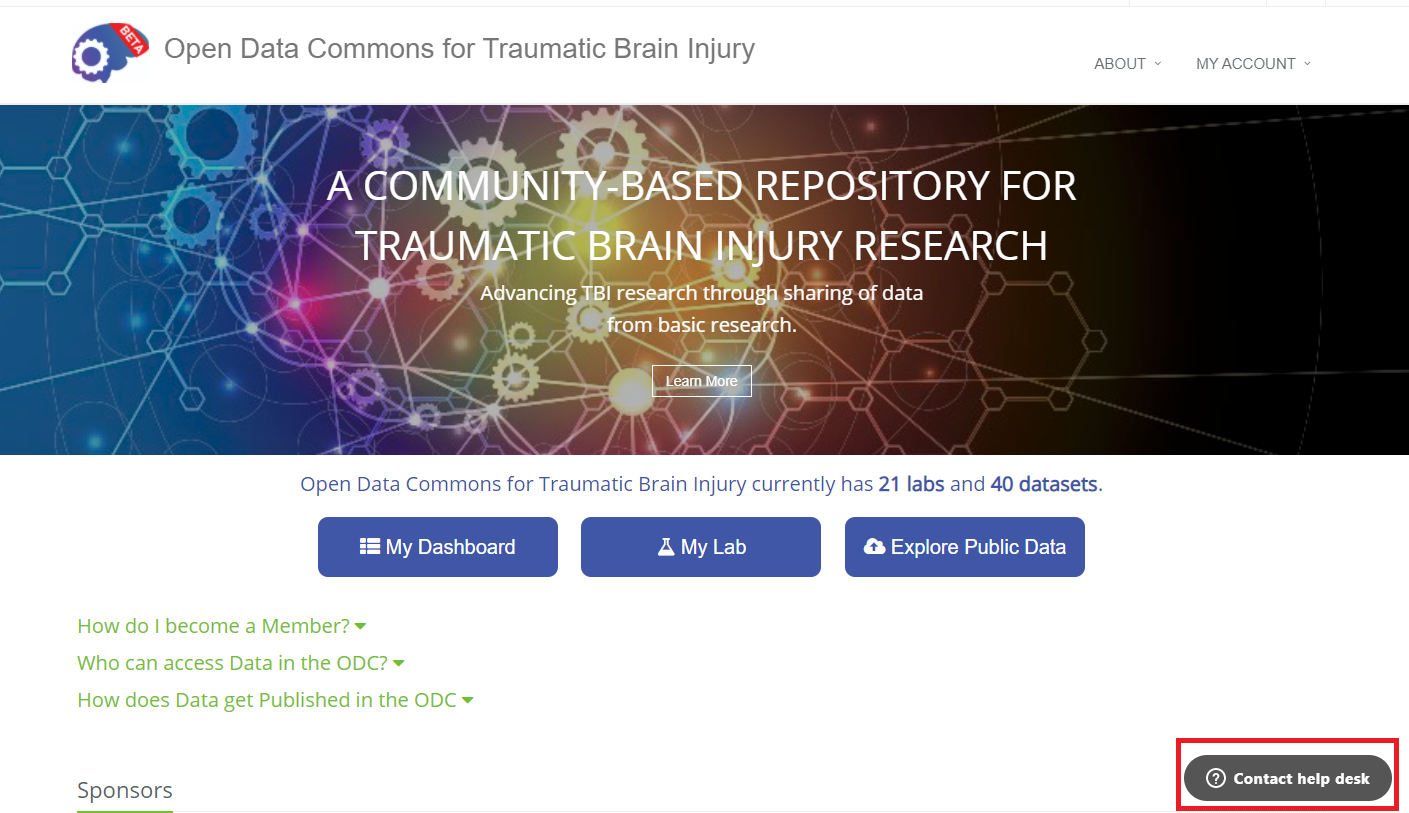
Contact Help Desk is at the bottom right of every page.
If you are reporting a bug, please also include the following information:
- Operating System
- Browser/Version
- Steps you took leading up to error
Please allow 2-3 business days for a response.
General Contact
If you cannot find a relevant help or FAQ section for your question, you can email us at: info@odc-tbi.org.
Please allow 2-3 business days for a response.
About
The ODC-TBI accelerates progress in pre-clinical TBI research through sharing and re-using data generated by the ODC-TBI community, and promoting transparency, rigor and reproducibility in pre-clinical TBI research.

Contact Us
Adam R. Ferguson, Ph.D.
Brain and Spinal Injury Center (BASIC)
Department of Neurological Surgery
University of California, San Francisco (UCSF)
Email: adam.ferguson@ucsf.edu